The schedule does two jobs. First, it plans which lesson comes up each week. Then, if you'd like, it also handles who teaches — rotating your teams, inviting them, collecting confirmations, finding subs, and emailing each teacher their lesson before they serve.
Planning Your Lessons
Each entry on the schedule pairs a date with a lesson from the curriculum. Go to Schedule, pick a date, choose a lesson from the dropdown, and hit Save Schedule. New dates fill in automatically at your service's regular interval, so planning a whole quarter takes seconds.
You can also leave a note on any date — handy for holidays, special services, or reminders like "bring props today." Once scheduled, upcoming lessons appear on your team's home page, in teacher emails, and in the parent portal.
Multiple Services
If your ministry runs more than one service (say, a 9am and an 11am), use the Change Service button at the top of the page to switch between them and plan each independently. You can give each service its own lessons, or have them alternate lessons — the services take turns through the curriculum (one gets lesson 1, the other lesson 2, and so on) so that across the rotation every child hears every lesson no matter which service they attend. Turn that on under Ministry Settings, and the schedule automatically skips ahead by the right number of lessons as you fill each service.
Holidays & Weeks Off
To override your regular plan for a holiday or special event, just change the lesson on that date. Leave a date's lesson blank for a week with no class, and add a note like "New Year's — no class" so everyone knows what's happening.
Scheduling Your Teachers
Beyond planning lessons, the schedule can staff them for you. You set up your positions and teams once; from then on the platform rotates your teams through the calendar, invites whoever is up, tracks who's confirmed, and helps fill gaps when someone can't make it. It's a lightweight alternative to a full scheduling suite — built right into the tool your teachers already use for lessons.
The whole flow at a glance
- Ask who's away — one email lets every teacher send back the dates they can't serve.
- Answer two questions — what your classes look like, and how often each person serves. We suggest the teams and who's on them; you correct it.
- Send invites for as far ahead as you want — one email per teacher covering all their dates.
- Print the sheet for the wall, and come back whenever you need to extend.
- Teachers confirm, decline, or request a sub from a simple link (no login required).
- Each confirmed teacher automatically receives their lesson a few days before they serve.
Ask who's away first
Open Teacher Rotation and click Ask for blockout dates. Every teacher gets their own link — no login or password — where they can add the dates they're away, or tap "I'm free for all of these" and be done. Their answers come back here, and nobody gets scheduled over a trip they'd already told you about.
You don't have to wait for replies before building. Anything that arrives later is picked up the next time you staff.
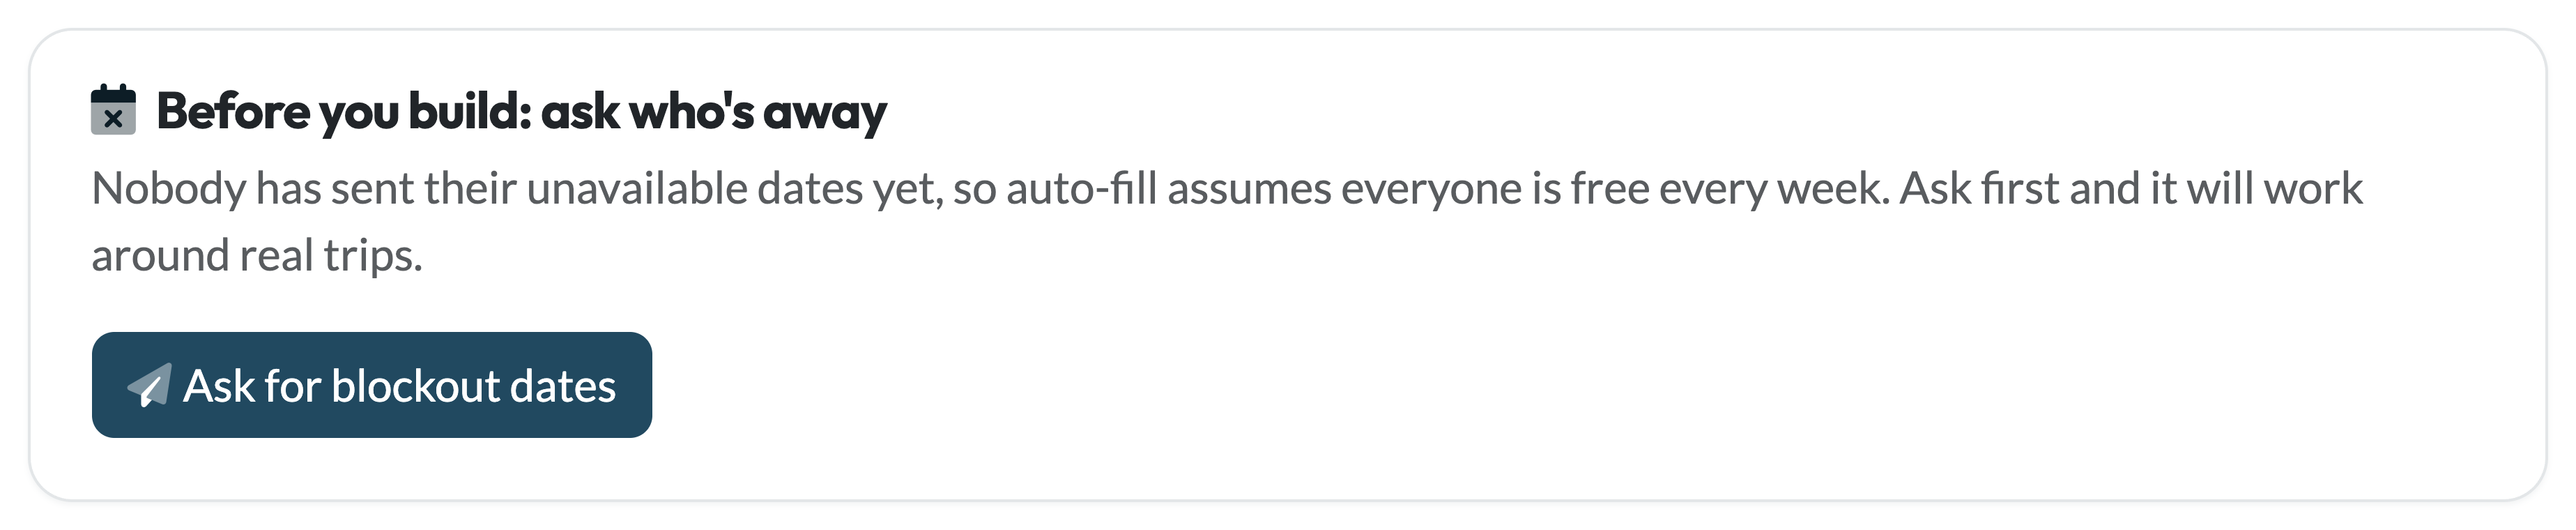
The message is written for you and covers the exact stretch you're about to schedule — edit it however you like.
Answer two questions
If you haven't set anything up yet, you get two questions and nothing else. What do your classes look like? — one room, two age groups, or a room per grade pair; each option says how many people it needs every week. How often will each person serve? — every week, every other week, or every third week, which is really a question about how many teams take turns.
From those two answers we create the positions, build the teams and put people in them as a first guess. It is far less to undo than a guess we made on our own: nothing here is permanent, nothing is emailed, and anyone not needed in the rotation is simply left off and keeps their access.
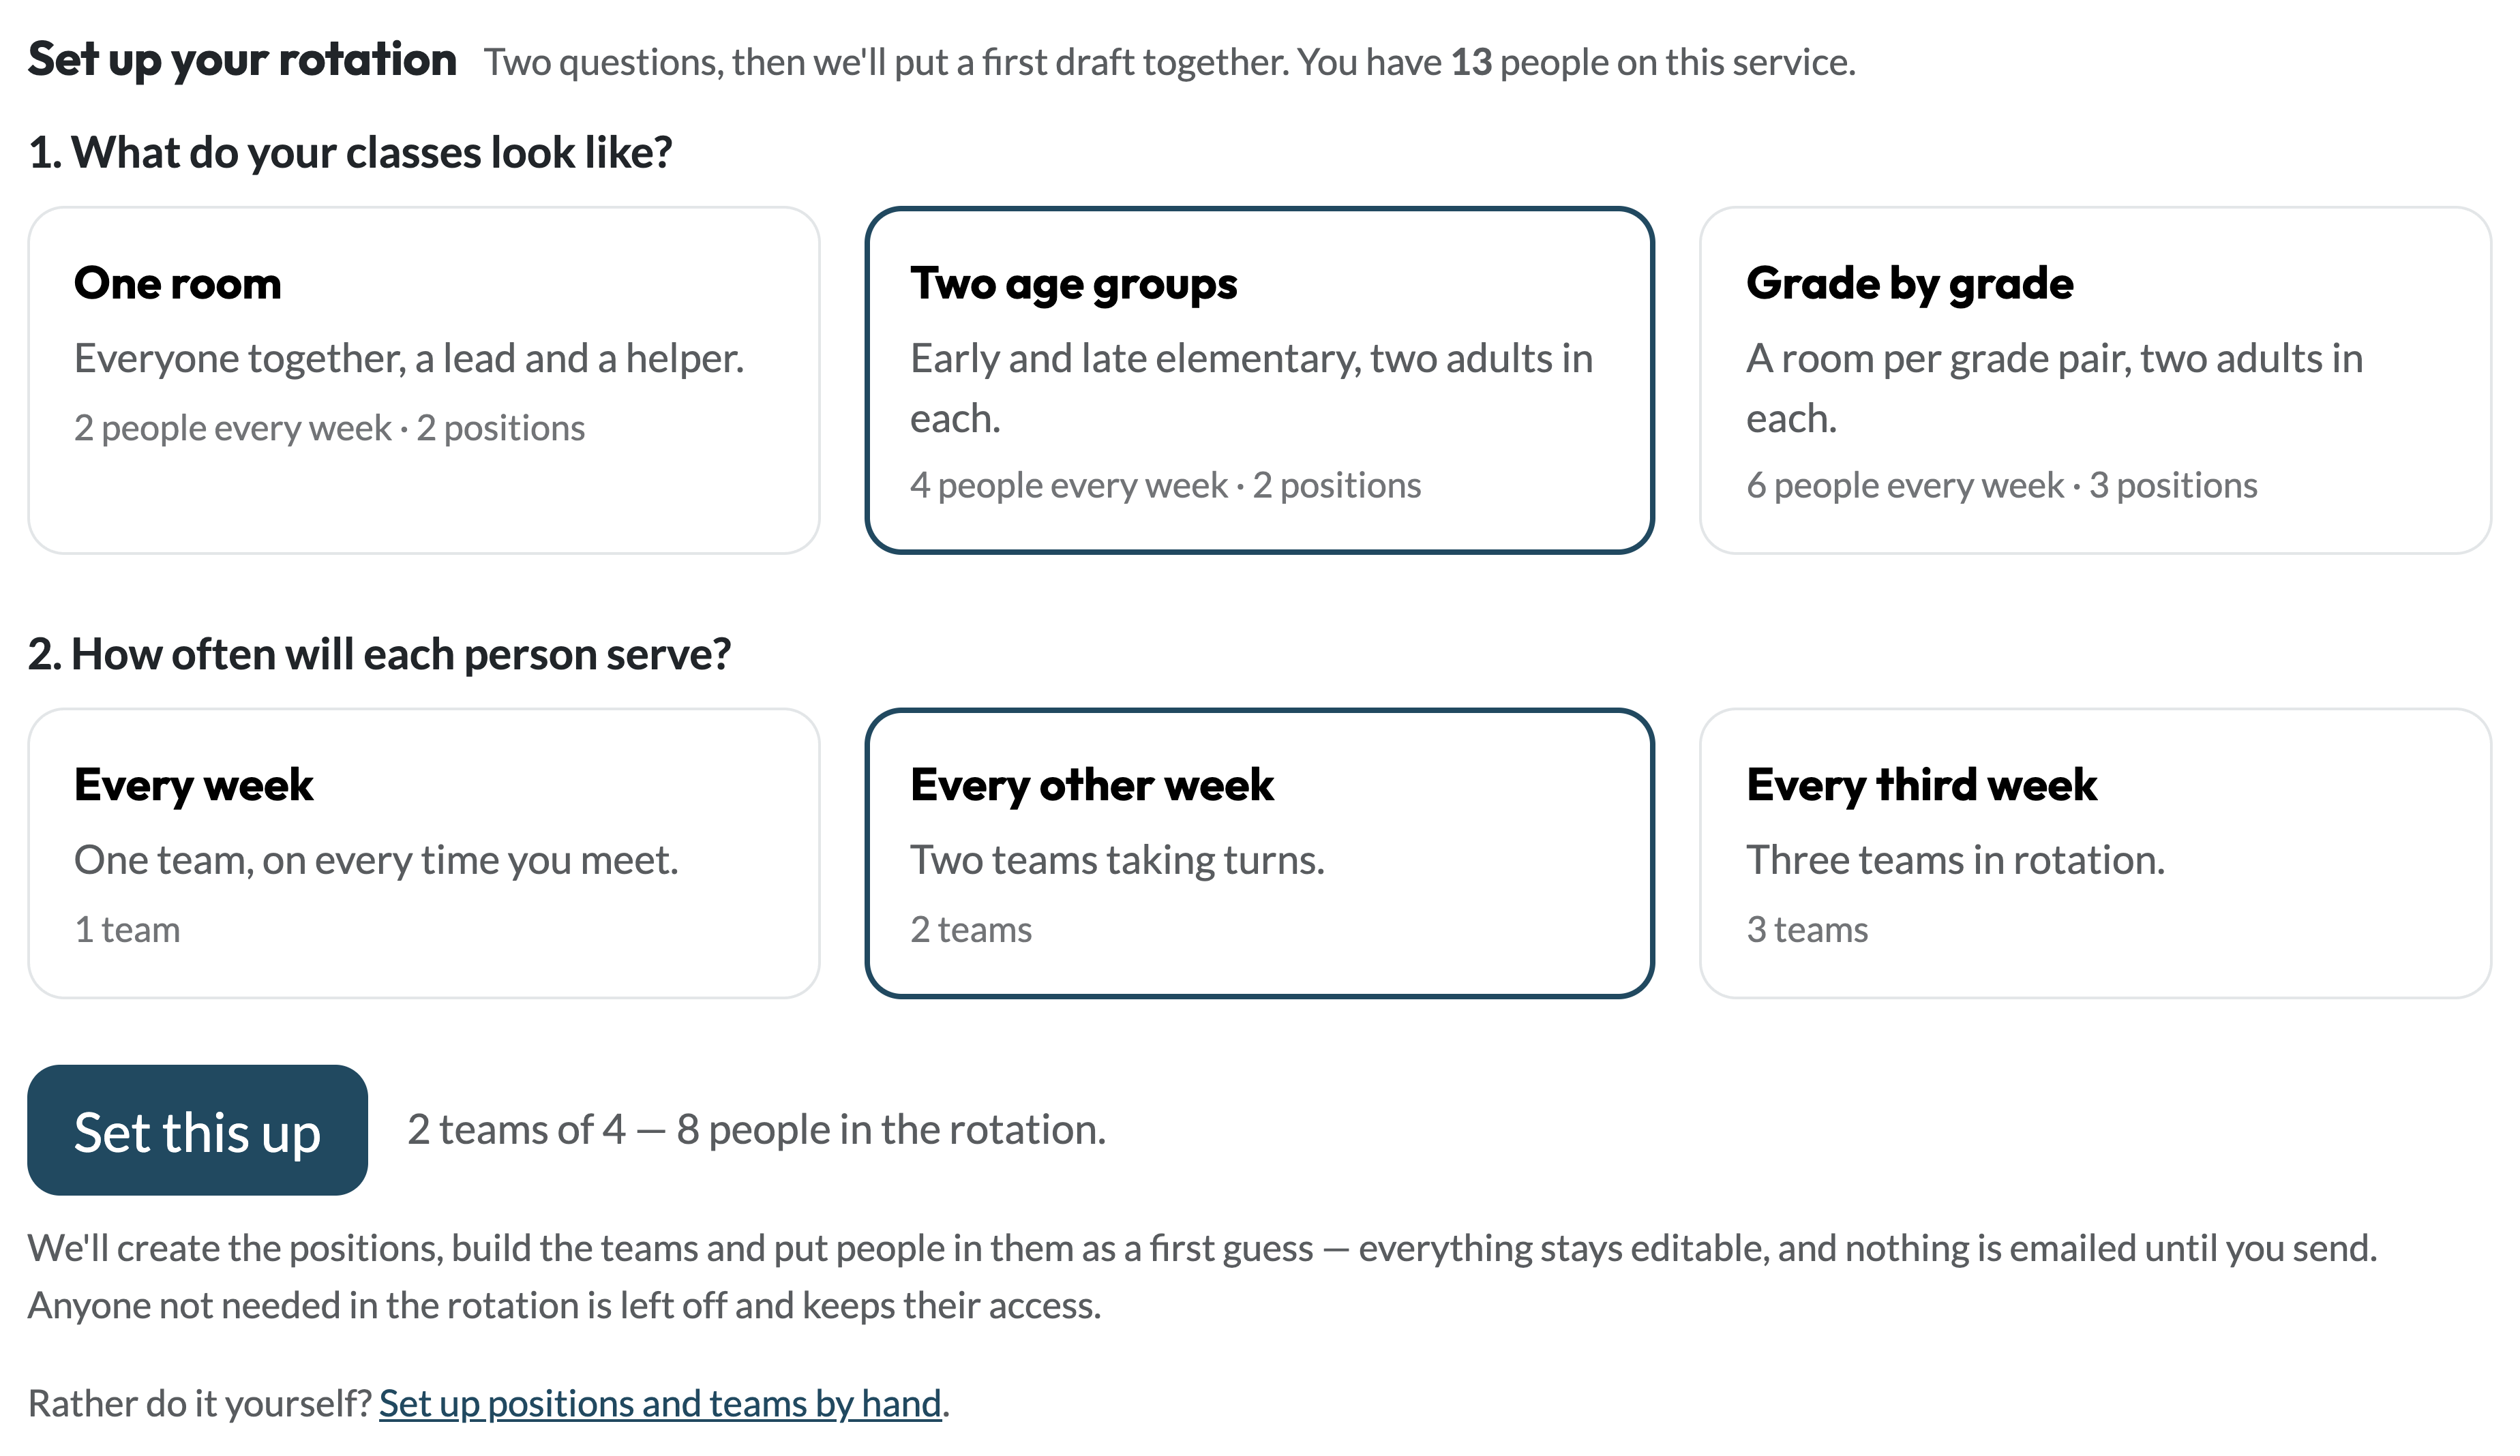
Already have positions set up? This step is skipped — your existing setup is never replaced. You can also skip it deliberately with "Set up positions and teams by hand".
Check who serves together
Positions are the roles you fill each time you meet — e.g. one Lead Teacher and two Helpers, or a room per grade. Teams are the people who serve together and take turns, one team per scheduled week.
We take a first guess at the teams and who's on them, so you're correcting a draft instead of starting from a blank page. Each team card lists the positions you need, with a row for every place to fill — a position needing two shows two rows whether or not anyone is in them, so an unfilled spot is visible rather than missing. Pick a name from any row to fill it; choose the blank to empty it.
Teams take turns in the order shown. Drag a team to the front to put it on the next week you haven't sent invitations for yet — weeks already invited keep the team they went out with, so reordering never moves somebody off a date they have already agreed to. If you'd rather staff fifth Sundays yourself, turn on "Skip 5th Sundays" and the rotation leaves those weeks alone.
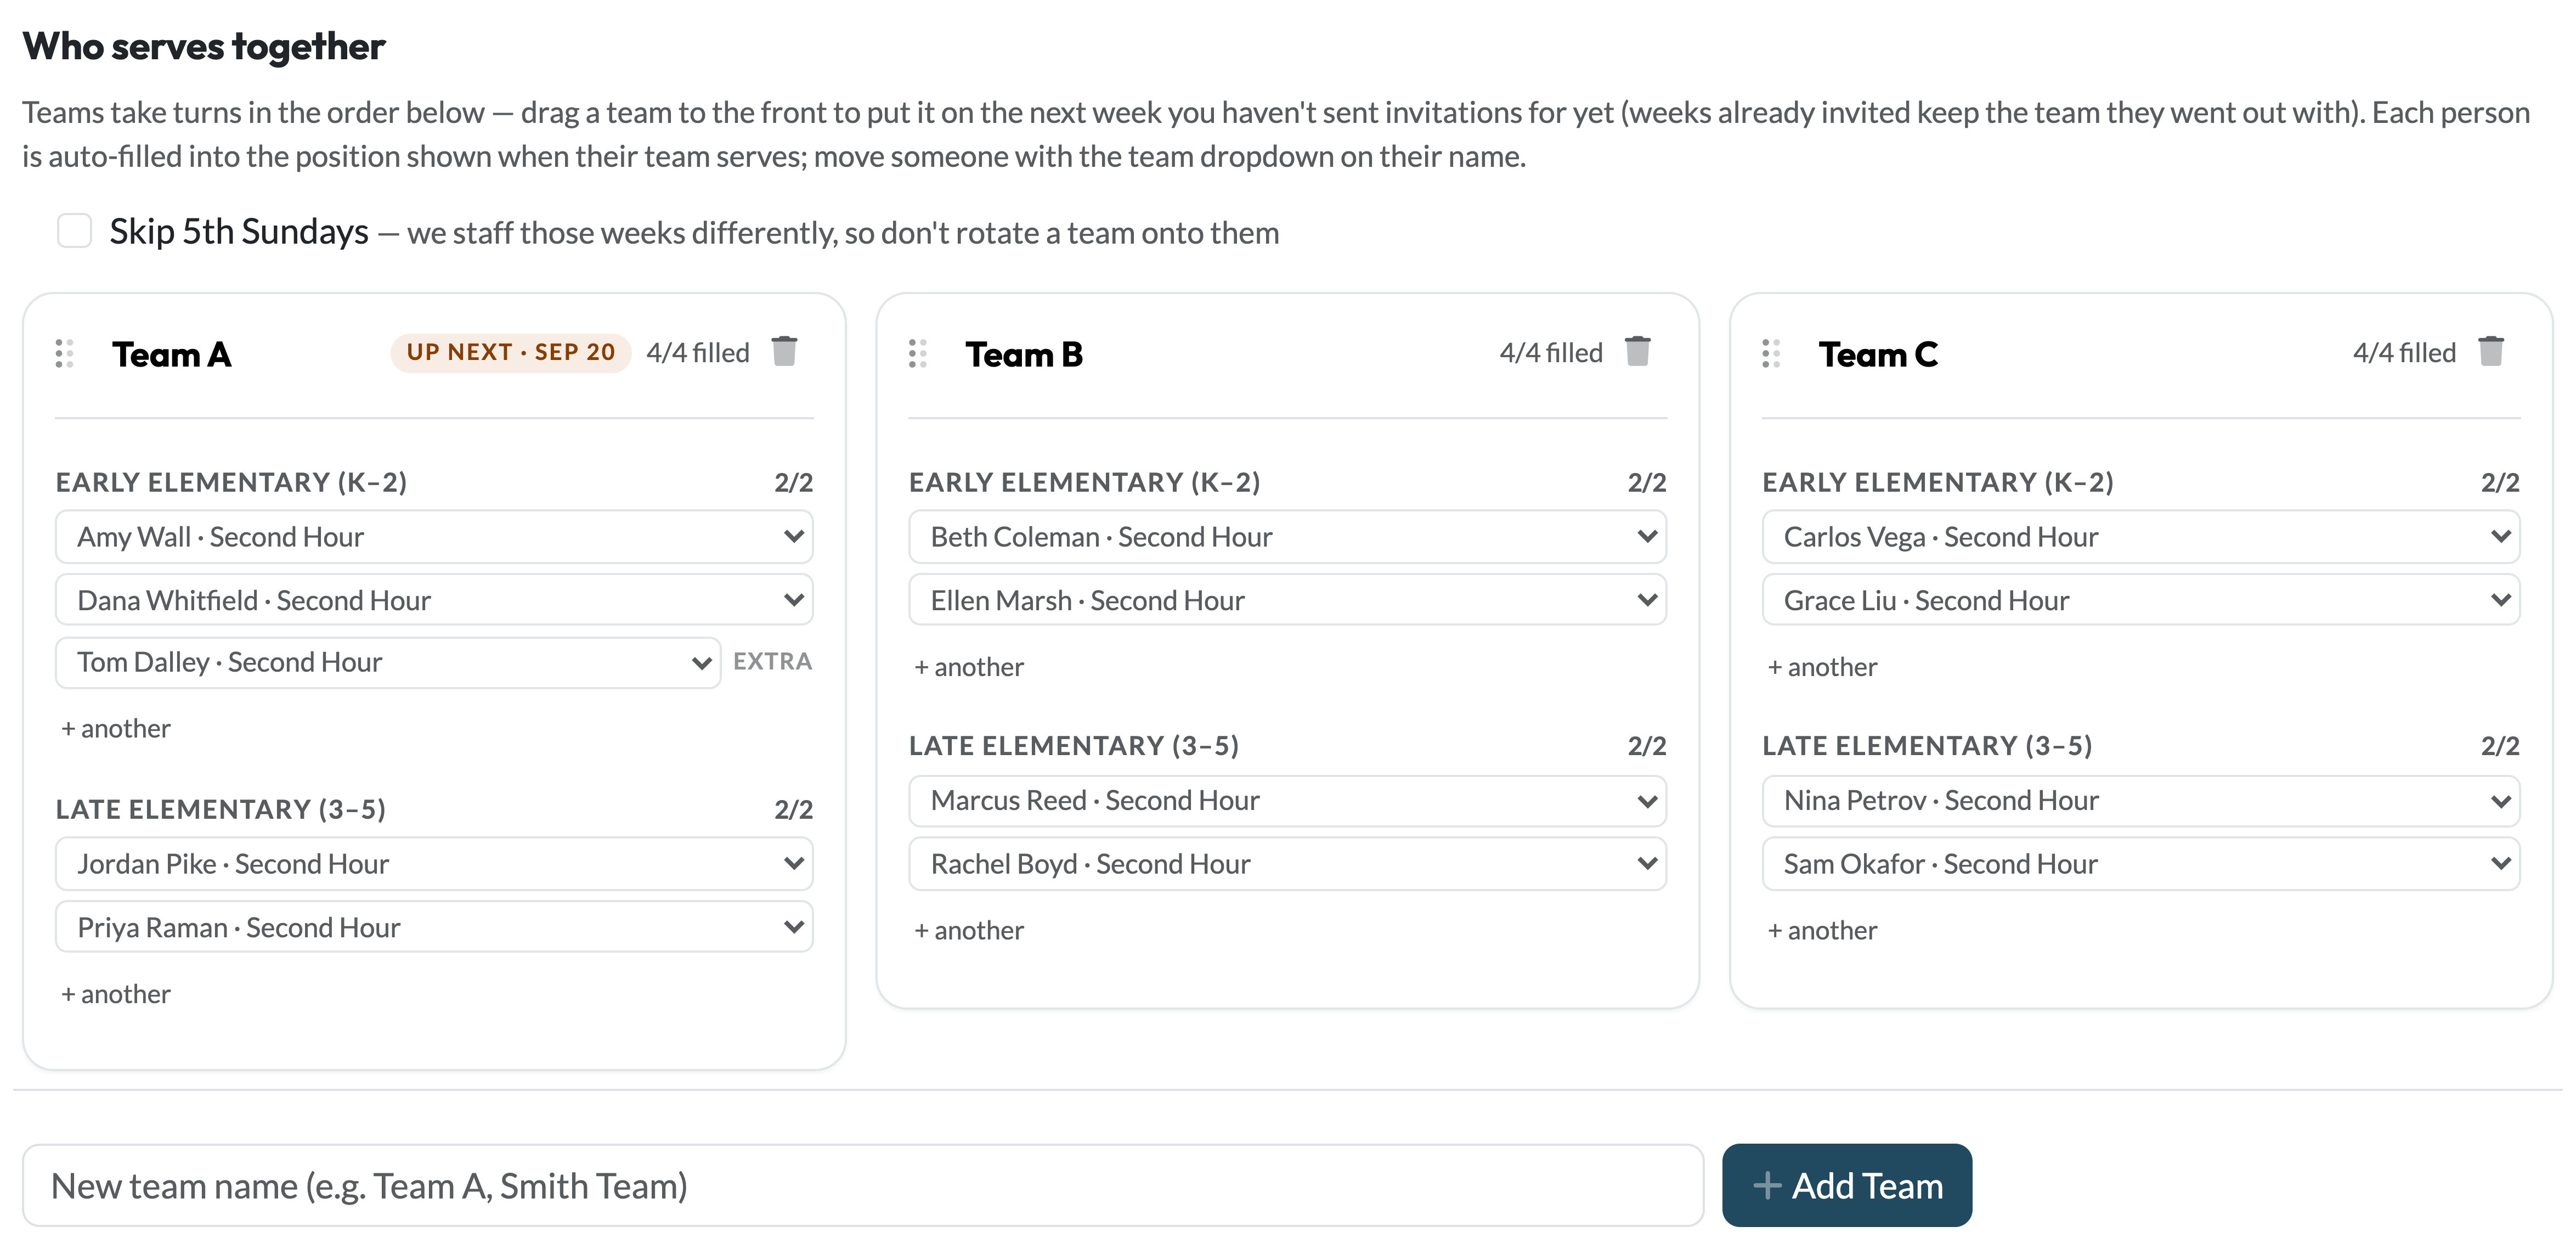
Each position shows how many of its places are filled. Anyone beyond what a position needs is marked extra — on the team, but not counted on.
If a team can't fill the week it is on, a line appears above the cards saying so — how many people short, and on which position. It only shows up when there is a problem; when the arithmetic works, the team cards already say so and there is nothing to add. Short is worth fixing before you send anything, because it means a room with nobody in it.
Send the invitations
This section opens by telling you where you stand: how far you are already staffed, how many of those weeks are still ahead, and how long the rotation has been running. If a week you have already sent has a hole in it — somebody declined, asked for a sub, or a place never filled — it is called out here with a link straight into that week, because filling it matters more than adding new weeks.
Underneath, a row of counts shows the progression every week is somewhere on: in draft → awaiting replies → confirmed, plus anything needing cover. Then you choose how much further to go. The choice is measured from the end of what you have already staffed, not from today, and each option names the date it reaches — so "a quarter more" really is another quarter, not a quarter that happens to overlap the weeks you already sent.
When it looks right, click Send invites. Each teacher gets one email covering all of their upcoming dates — not one email per week. The line beside the button says how many people that is and how many more weeks it covers, and weeks already staffed are never re-sent. Anyone who told you they're away is skipped, with that week's place left open rather than scheduled over.
Below the button, "Here's what you're about to send" lays the whole run out week by week — each one badged Draft, Invited, Confirmed or Needs cover, with the same marks on the individual names. Nothing in it has been emailed. Weeks you have already sent appear there too, for context, and won't go out a second time.
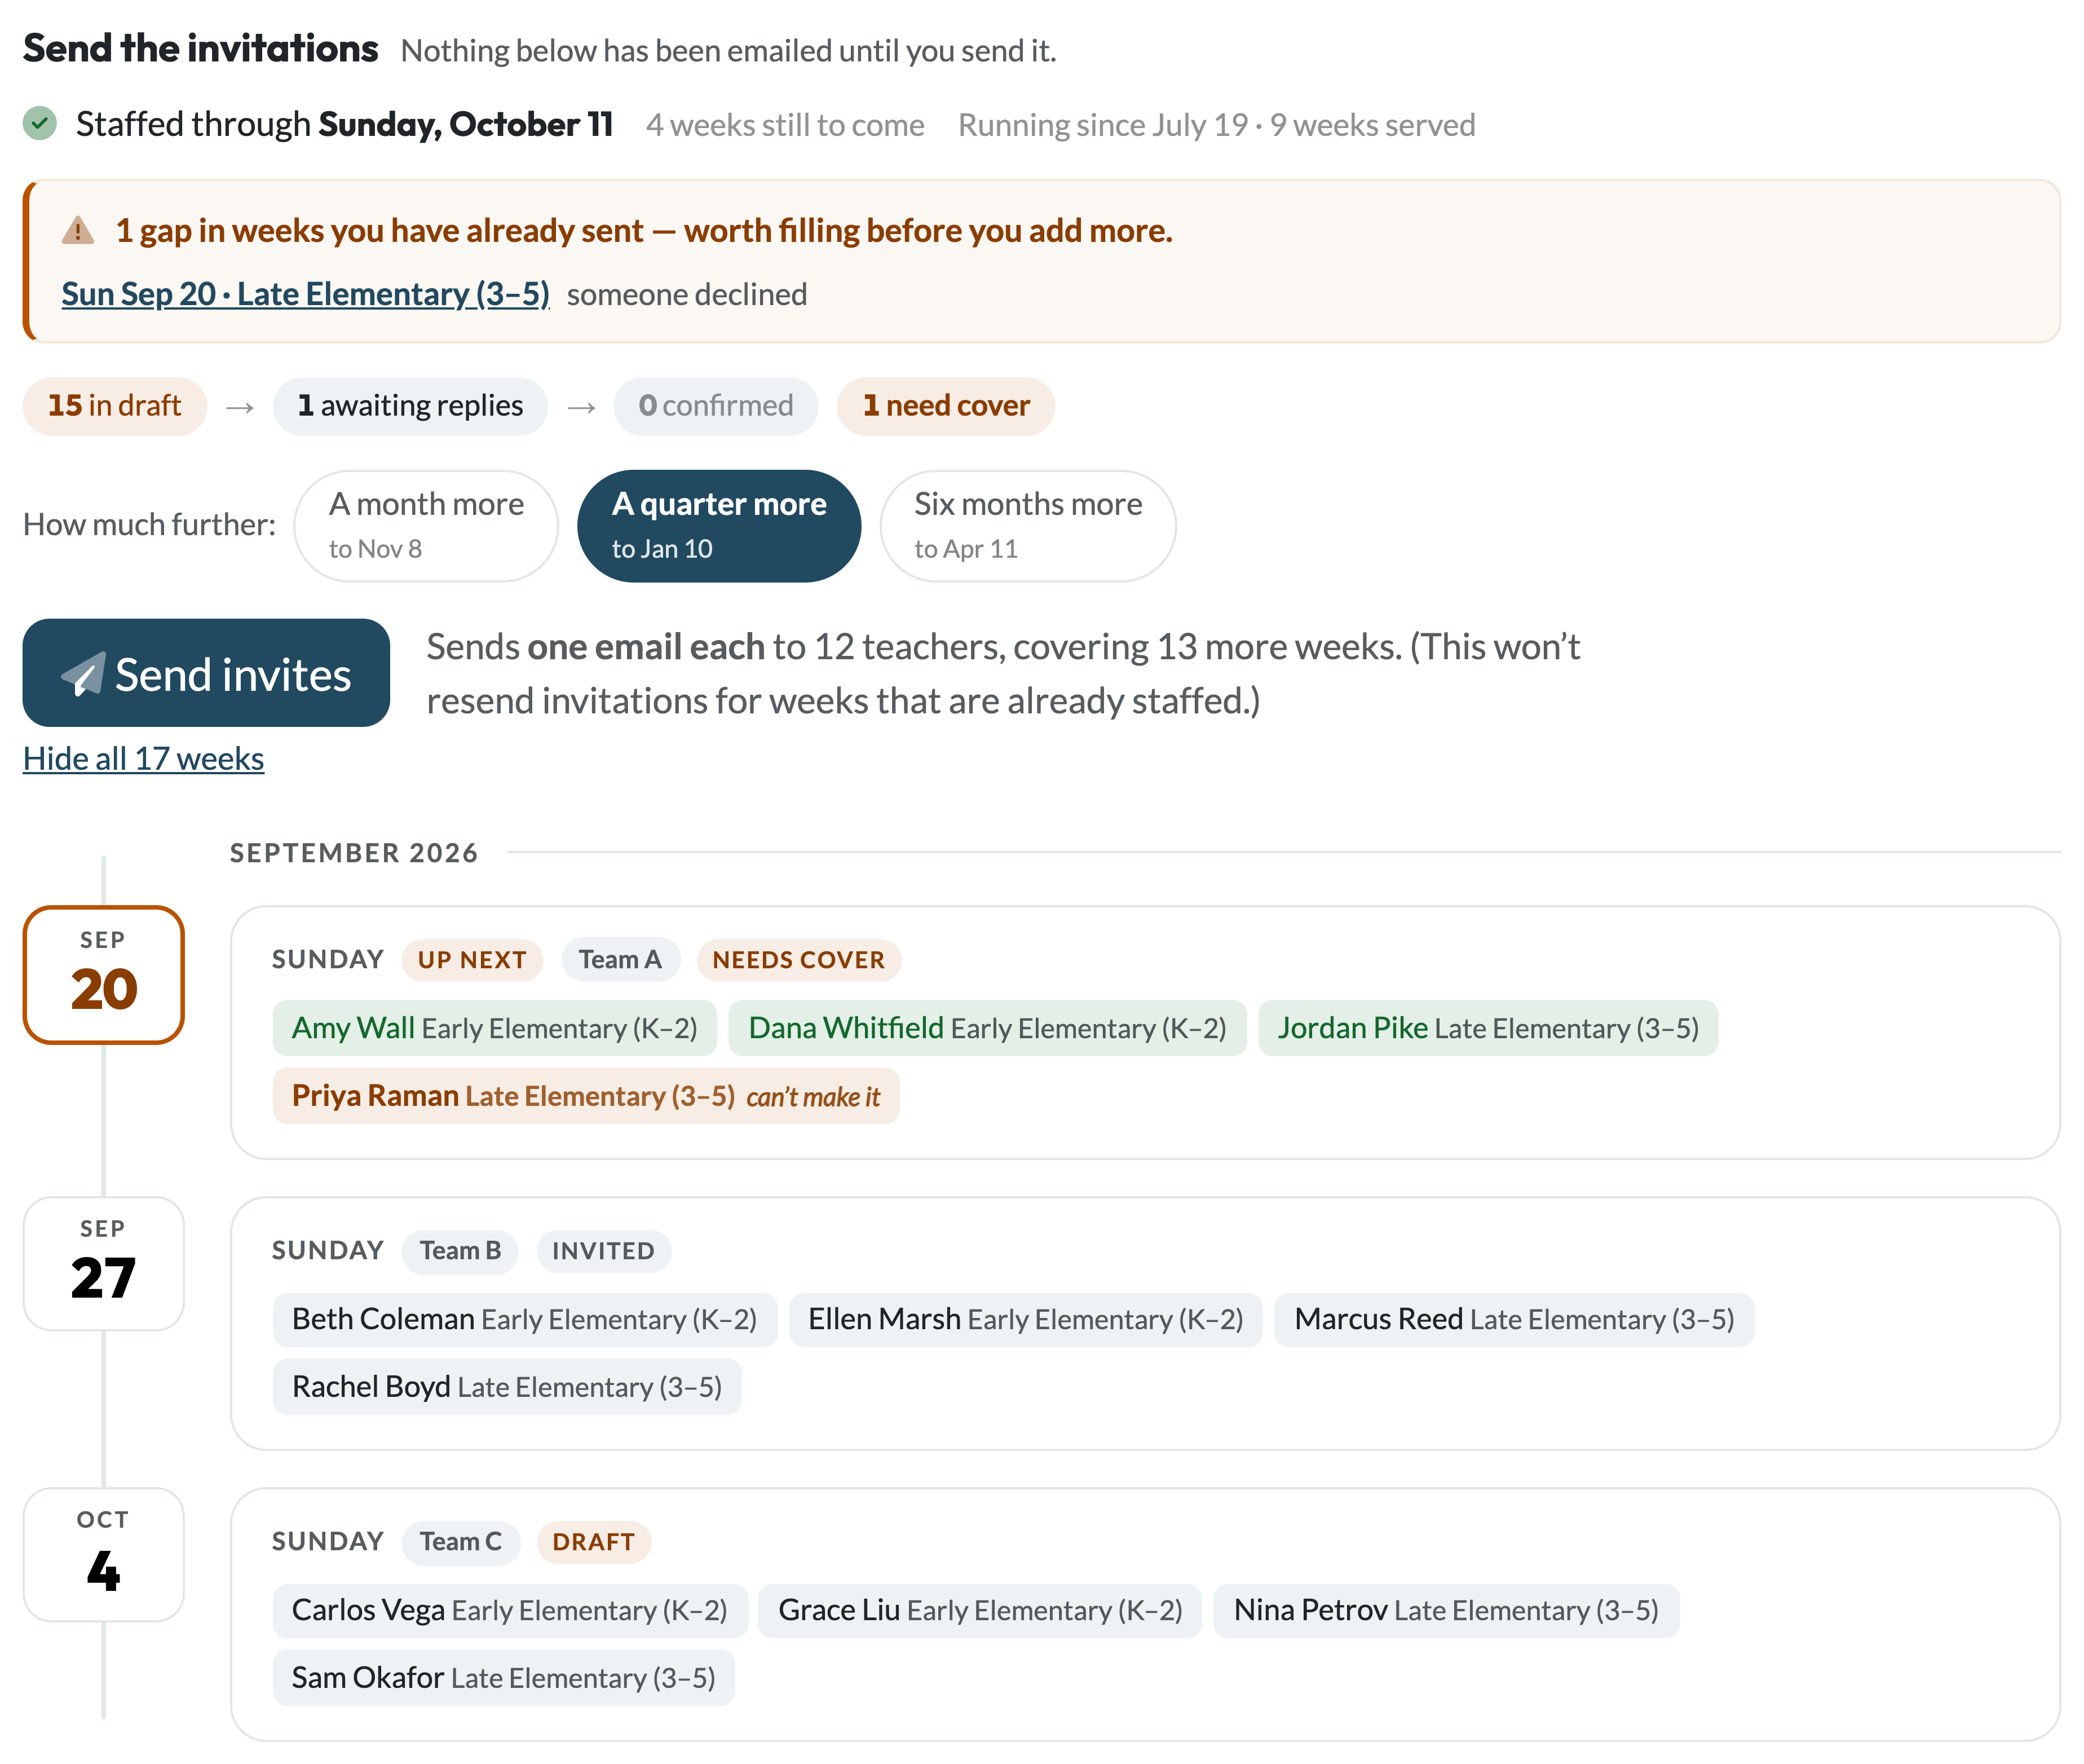
Staffing only reaches dates already on your lesson schedule — add more weeks on the Schedule page if the window runs out.
Swapping one teacher for a single week is a different job, and it stays on the Schedule page: open that week, change the slot, or open it to the team and let someone claim it.
Print it for the wall
From the Schedule page, Print the serving schedule opens a clean grid of the weeks ahead: date, lesson, and who is in each class. Pressing Cmd+P (or Ctrl+P) anywhere on the Schedule page opens the same sheet — the Schedule page itself is a form full of dropdowns and doesn't print into anything useful.
Each name carries its own mark, so the sheet on the wall says what has actually happened rather than just who is pencilled where:
- A filled check — confirmed. They replied and said yes.
- A hollow circle — invited, waiting on a reply.
- A dashed circle, name in italics — pencilled in. Nobody has emailed them yet.
- Sub needed — somebody declined or asked for cover. Click it to open that week.
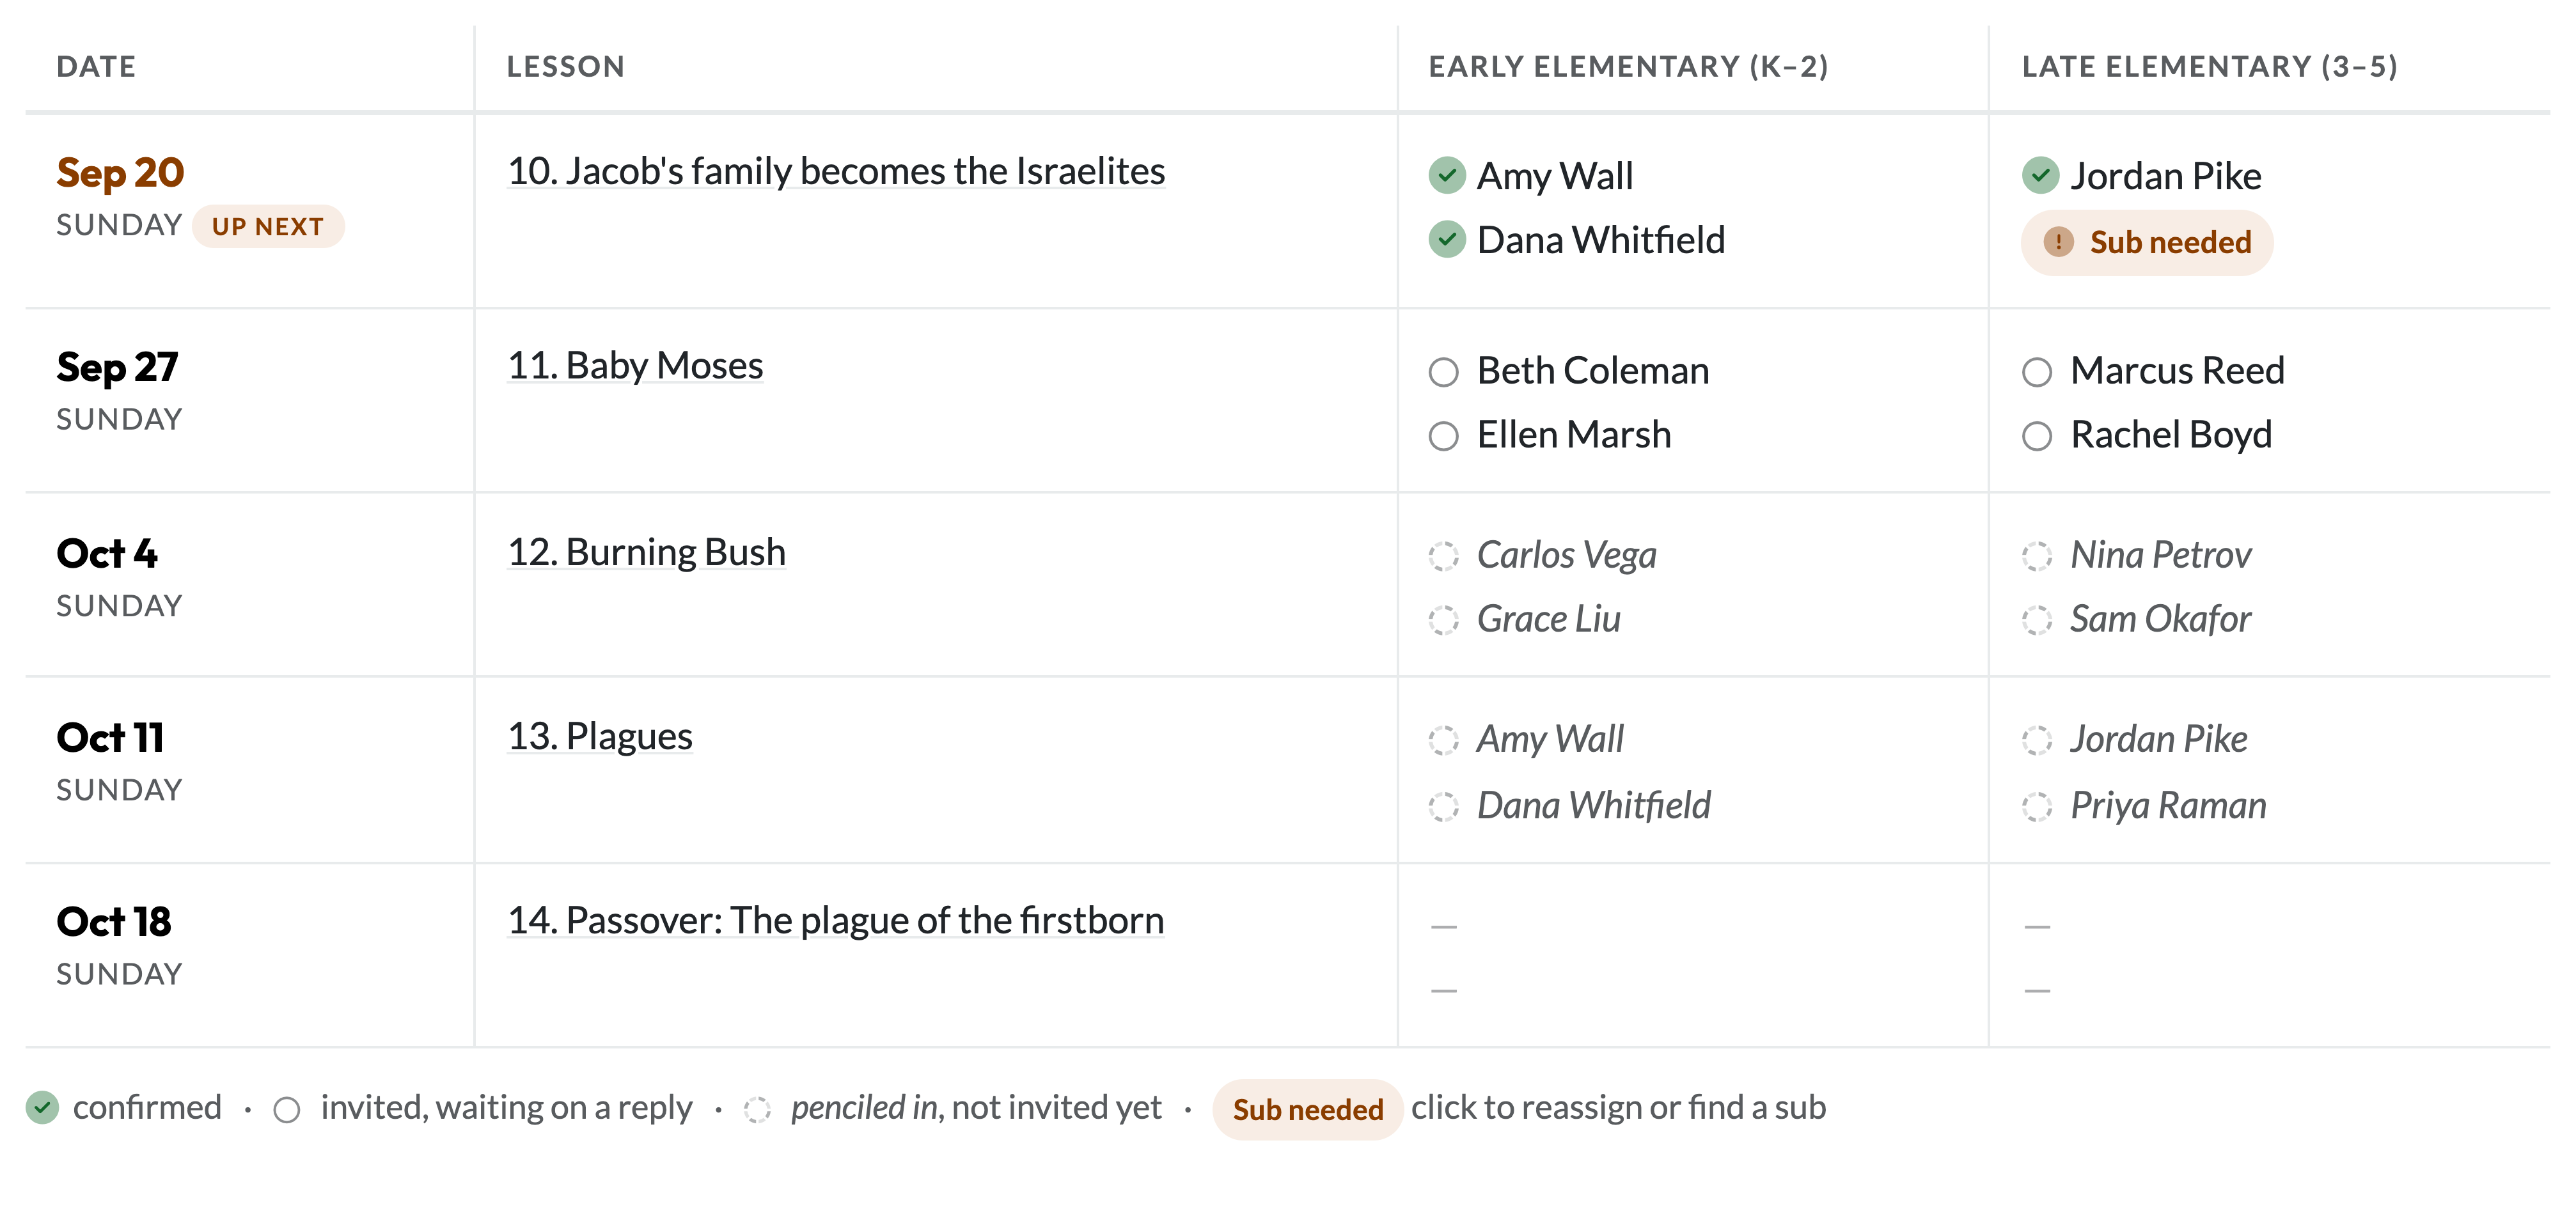
Teachers can open this too — it's the same sheet, so everyone is reading one source.
What your teachers see
Each teacher gets an email with a single link — no password needed. It opens their outstanding dates, where they can accept everything at once or reply to each date individually. If they can't make one, they can decline or ask the team to cover it right from the same page.
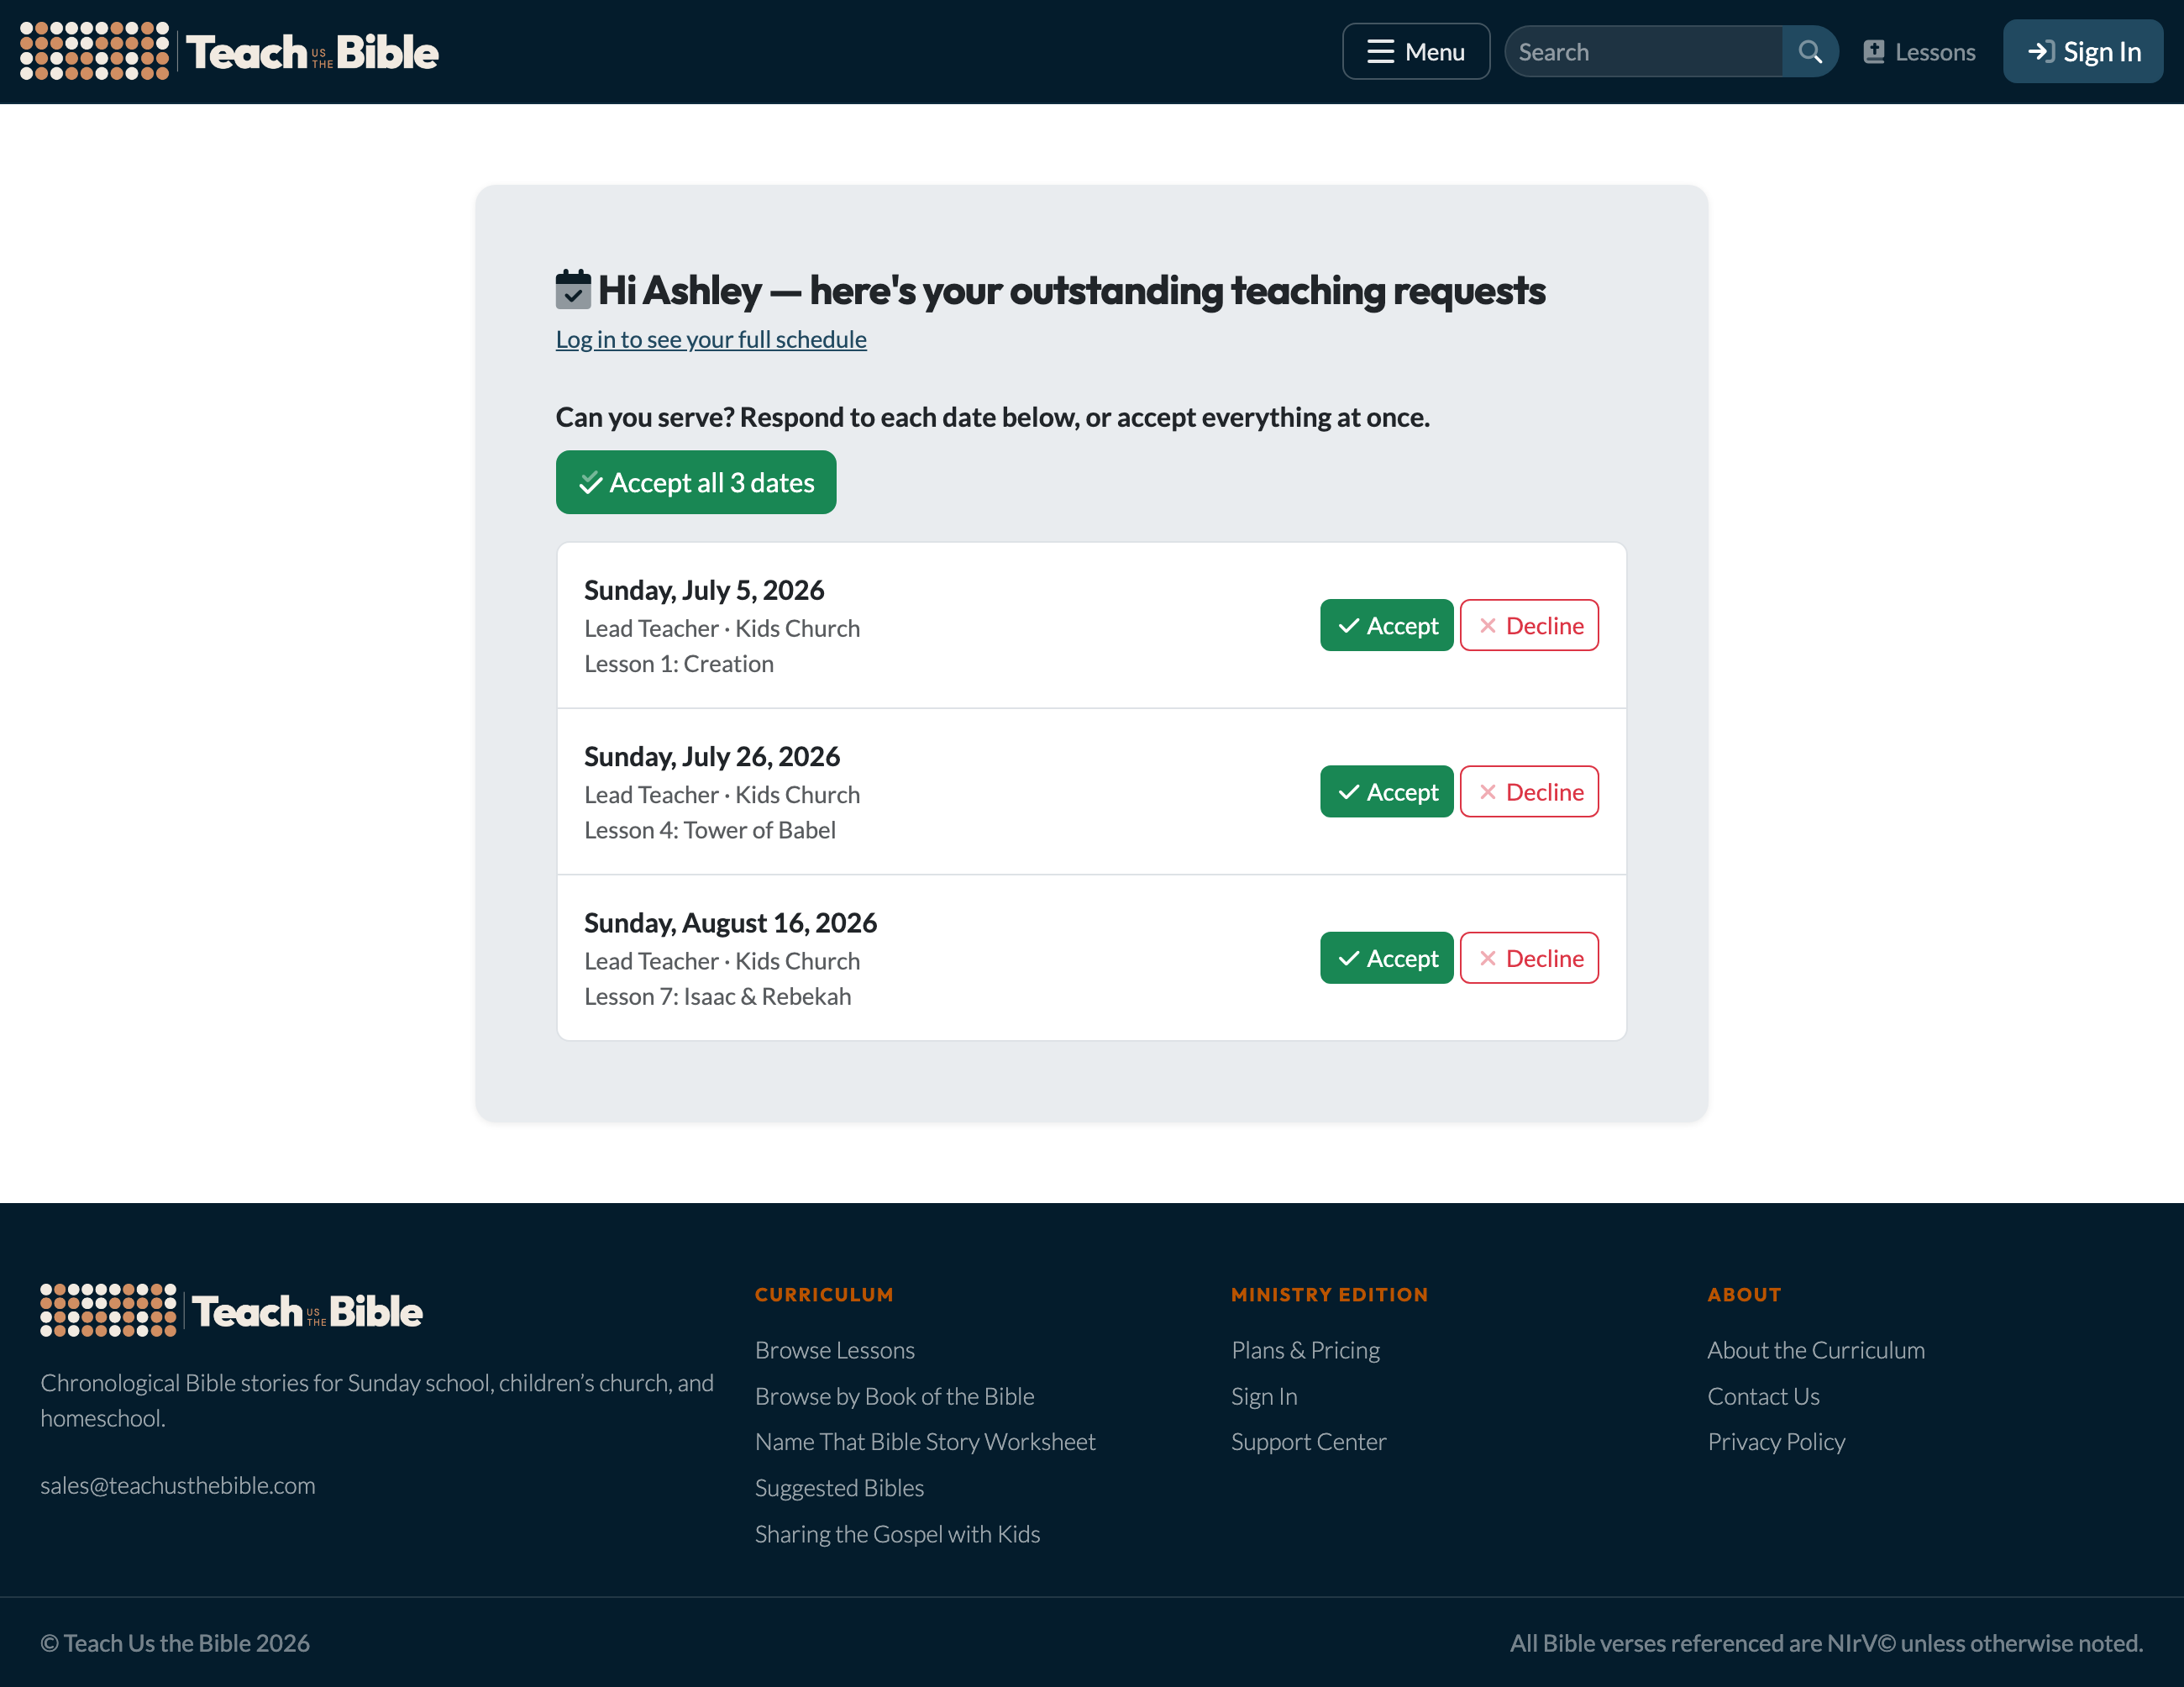
The teacher's respond page — accept all dates in one click, or handle them one at a time.
Signed-in teachers also get a My Schedule page with the same controls, their upcoming dates, and a place to add time off. When you're an admin, you'll see each week's confirmations right on the Schedule page and get a heads-up email whenever someone declines.
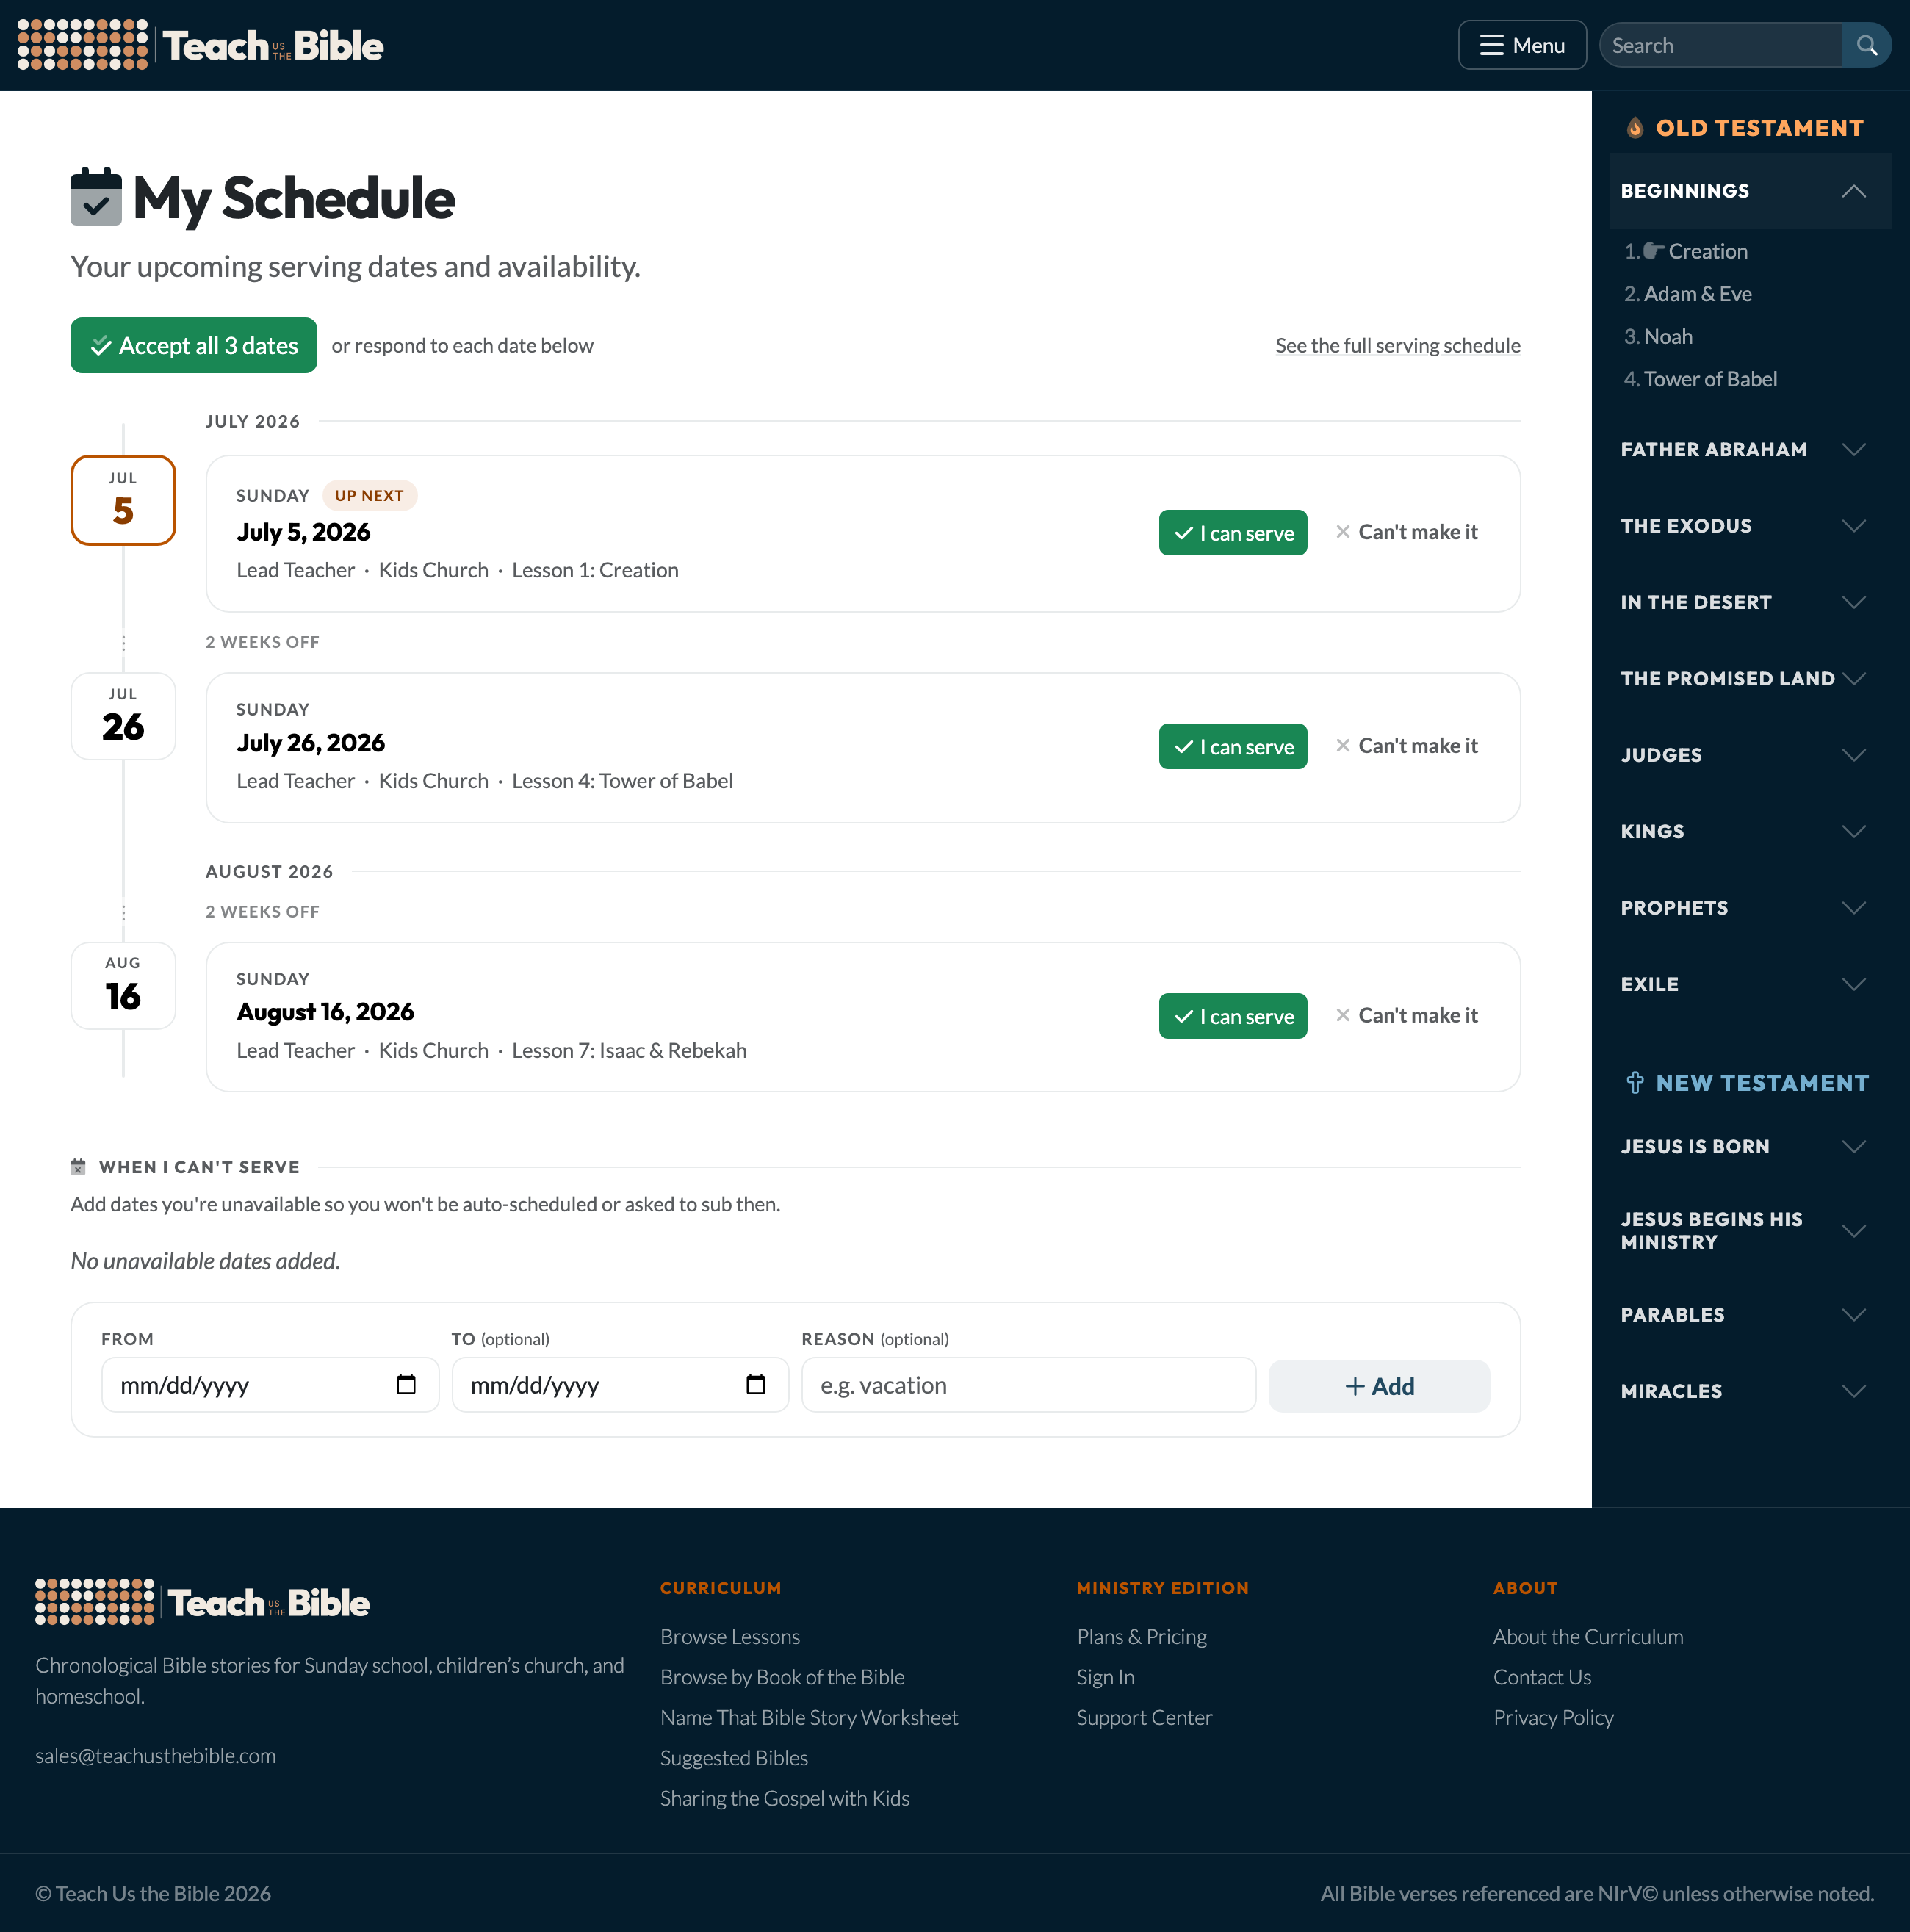
My Schedule shows a teacher's upcoming dates — and, at the bottom, where they mark dates they can't serve.
Subs & time off
When a teacher can't make a date, they can ask the team to cover it. The platform broadcasts the open spot to your other eligible teachers, and the first to claim it gets it — everyone else is told it's already taken. You and the original teacher are notified once it's filled.
Teachers can also add time off themselves, either from the link you send with Ask for blockout dates or under "When I can't serve" on their My Schedule page. Blocked-out dates are skipped when you staff a stretch of weeks and left out of sub requests, so no one is scheduled when they're away.
Automatic lesson emails
This is where it all pays off. A few days before each service — as much lead time as you choose, up to three weeks — every confirmed teacher automatically receives their lesson, with the parts you select (lesson prep, the lesson itself, reinforcement activities, videos). Turn it on and set your preferences in the Automatic Lesson Emails section of Ministry Settings. Nobody has to remember to send anything — teachers just get what they need, right on time.
This works whether you schedule teachers here or in Planning Center. Read the full guide to Automatic Lesson Emails
Need help?
support@teachusthebible.com